Who Is This Product For?
This product IS for you if:
- You have experience building Flutter apps
- You're familiar with Firebase (Auth, Firestore, Functions)
- You understand dependency injection and state management
- You can configure API keys and environment variables
- You want a production-ready, well-architected codebase
This product is NOT for you if:
- You're just starting to learn Flutter
- You've never worked with Firebase before
- You expect a no-code or drag-and-drop solution
- You're not comfortable with command-line tools
- You need extensive hand-holding for basic setup
Estimated setup time: 1-2 hours for experienced developers | Support: Installation issues and bug fixes
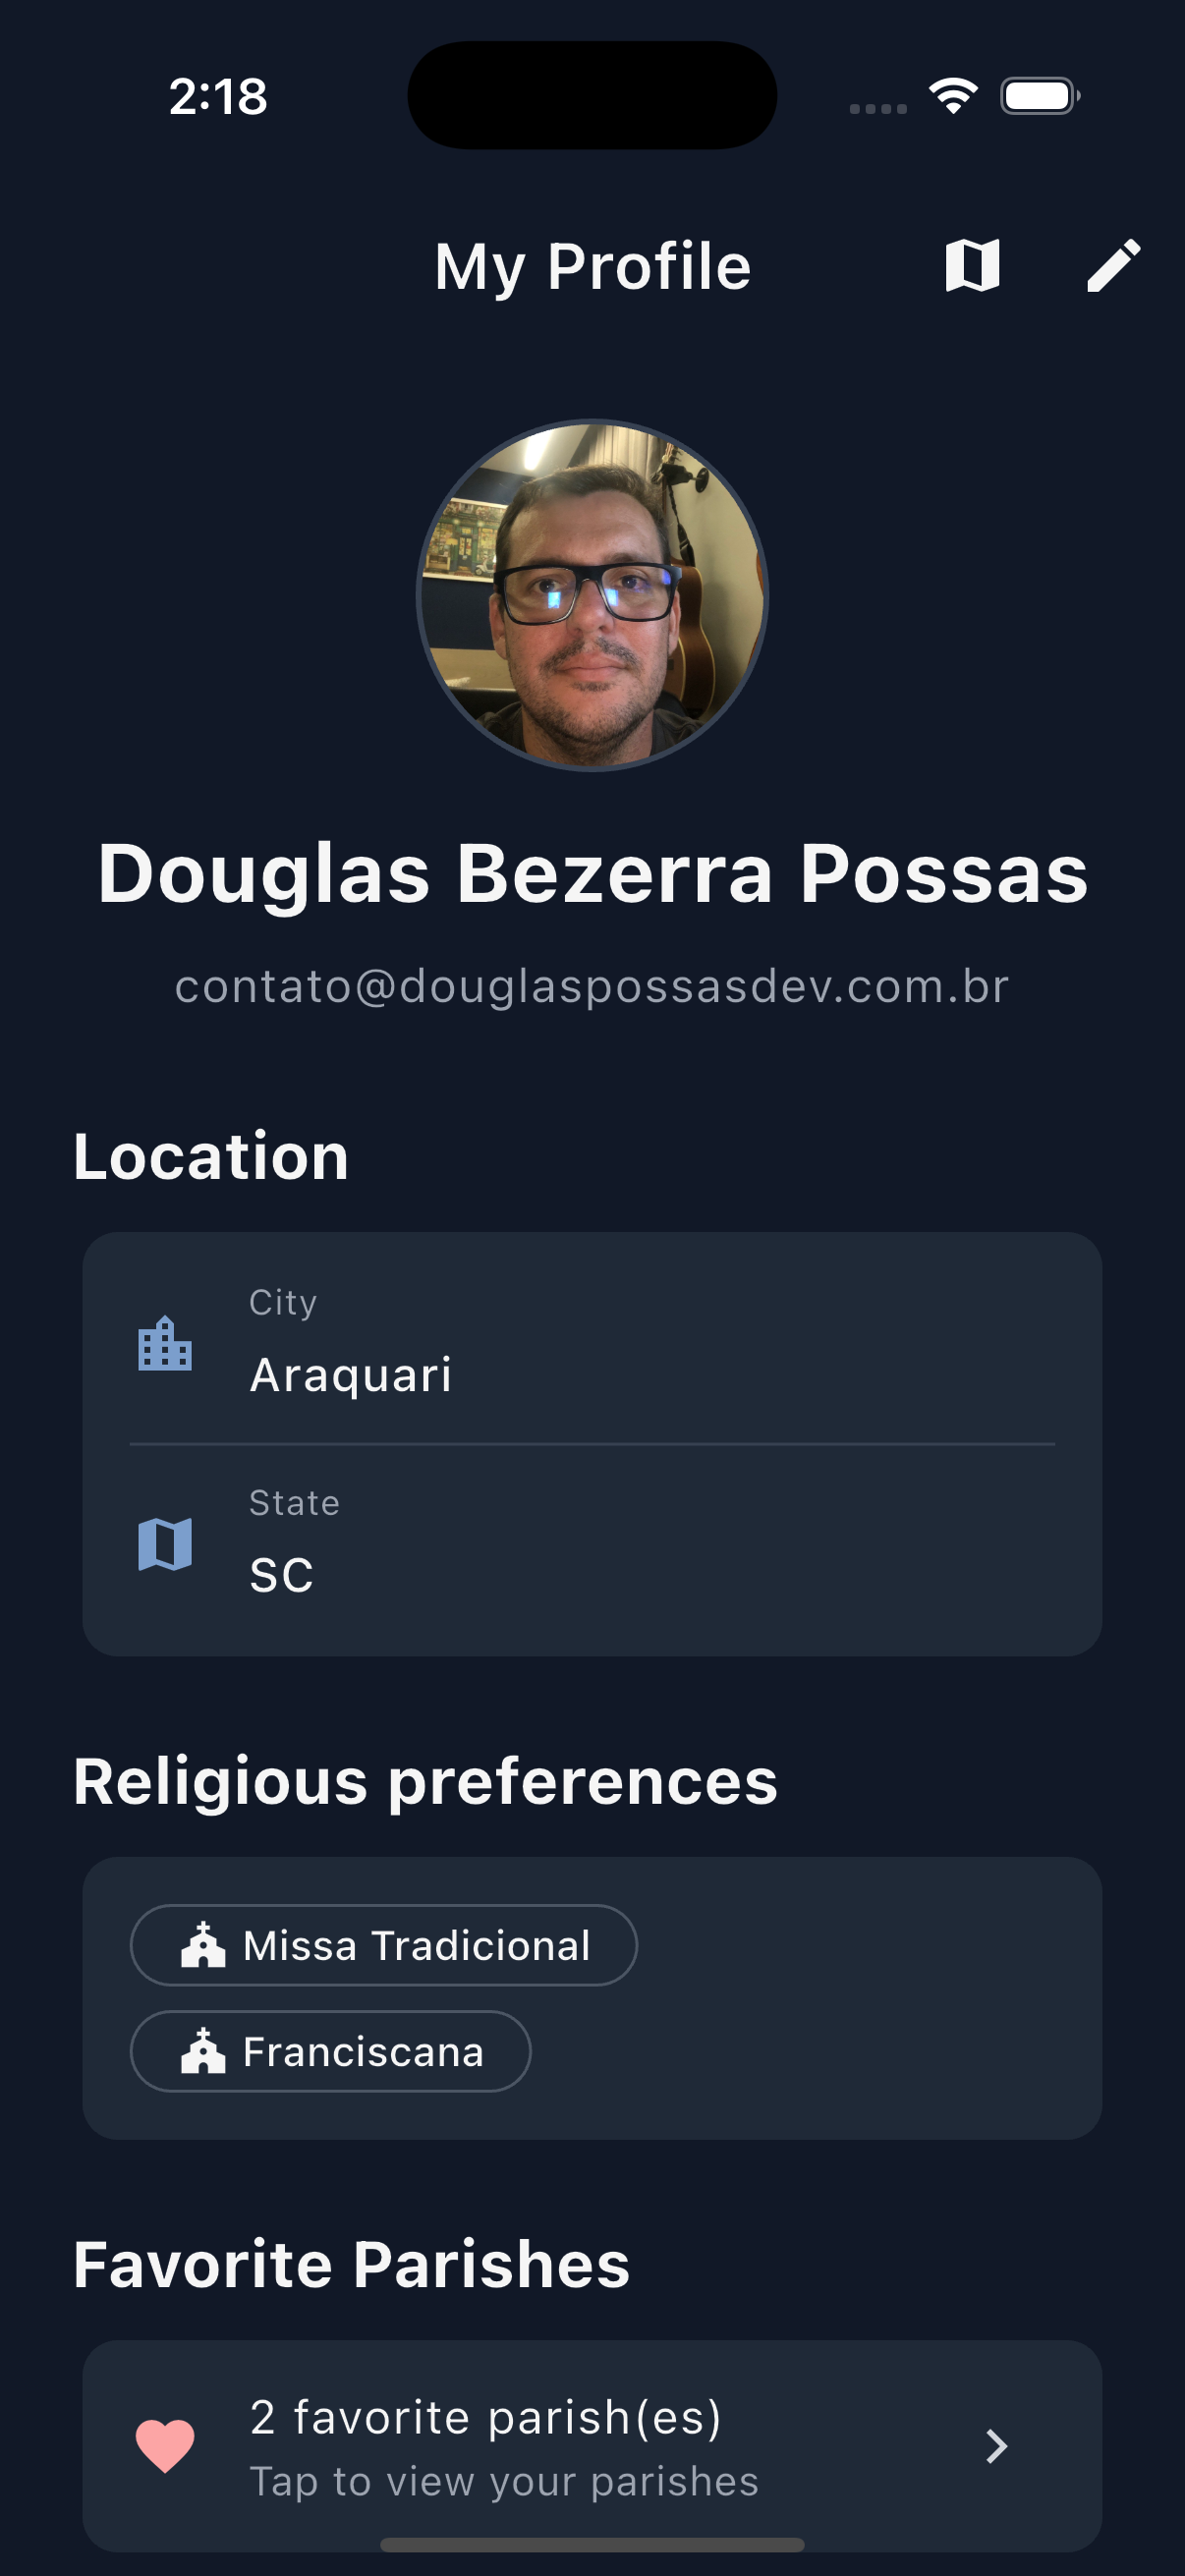
App Preview
A beautiful, modern mobile application for Catholic communities.
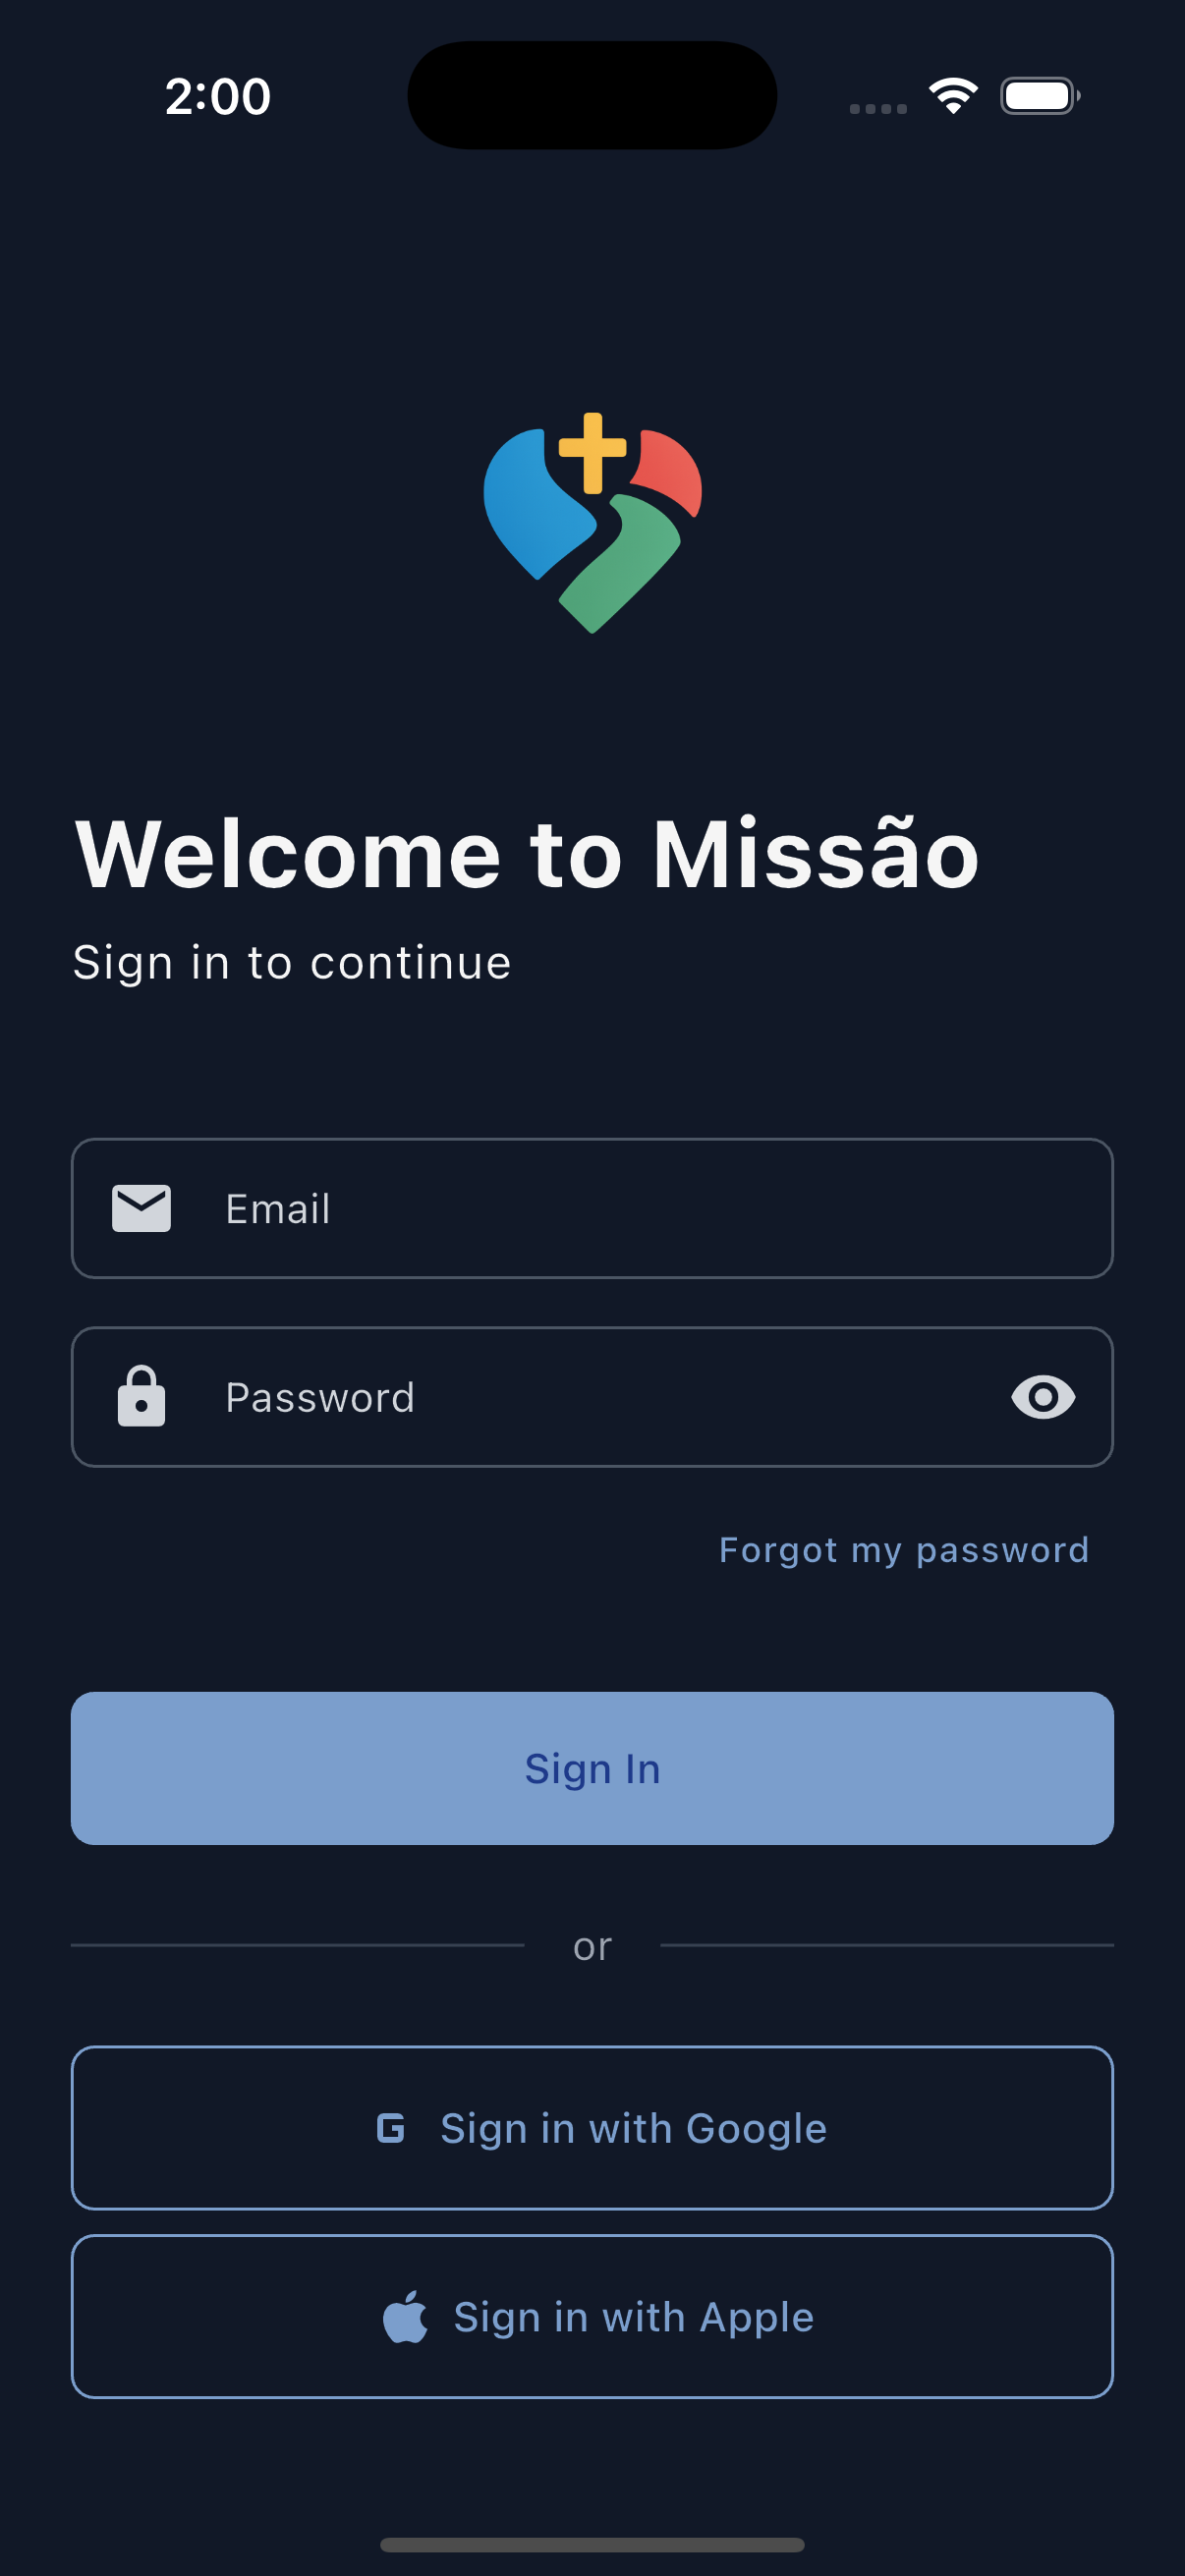
Login

Home
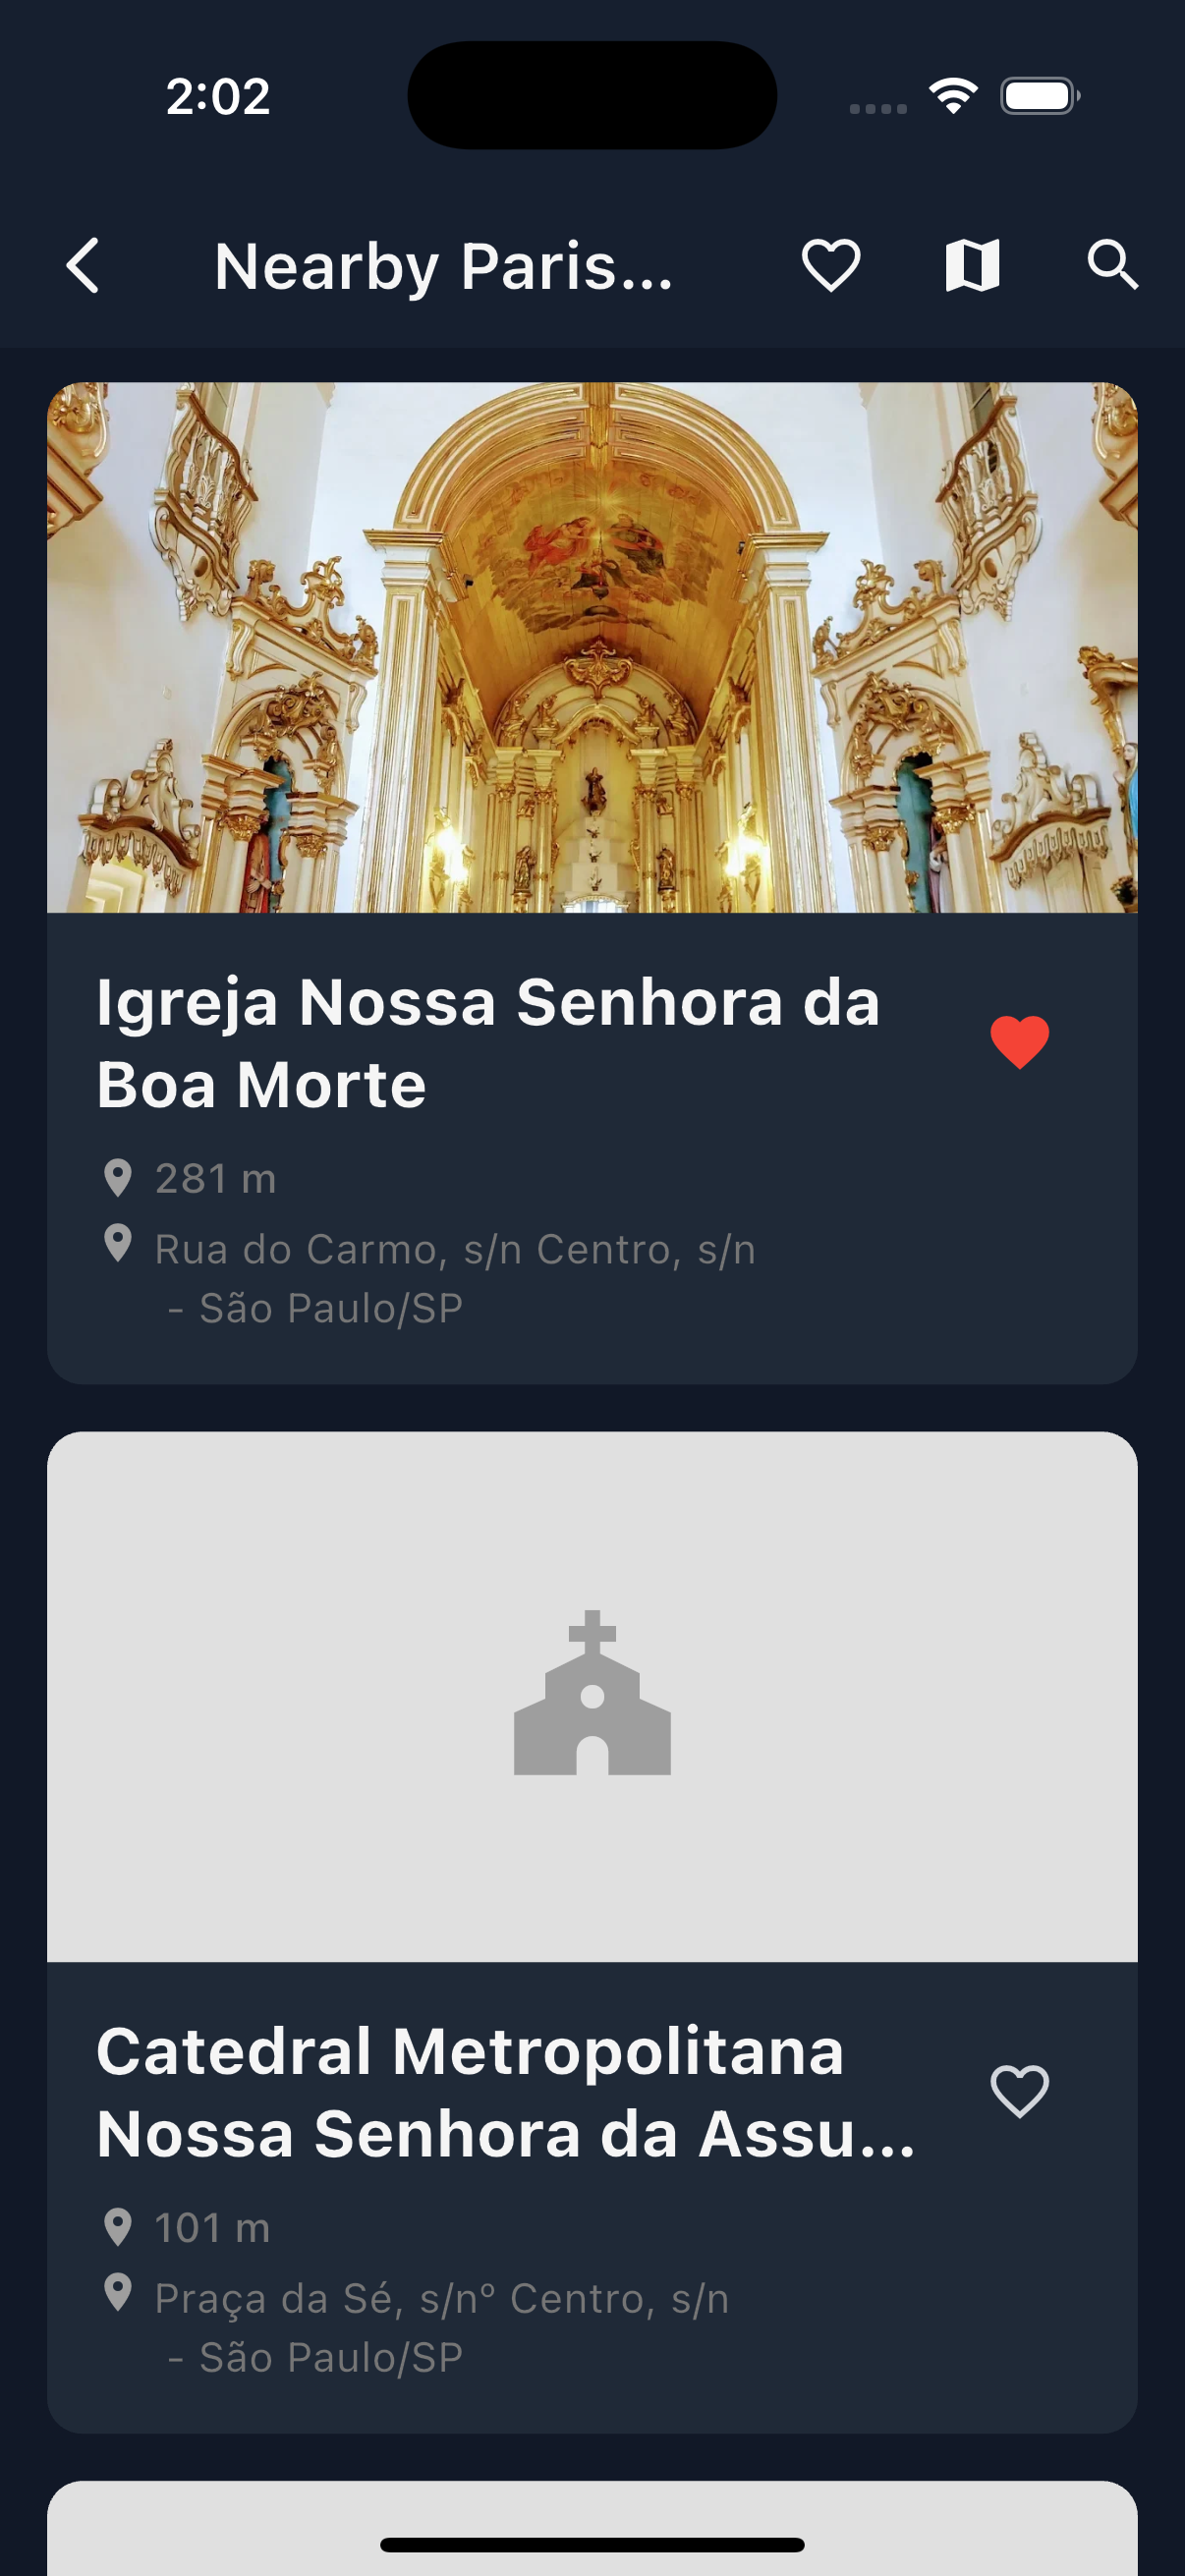
Parishes
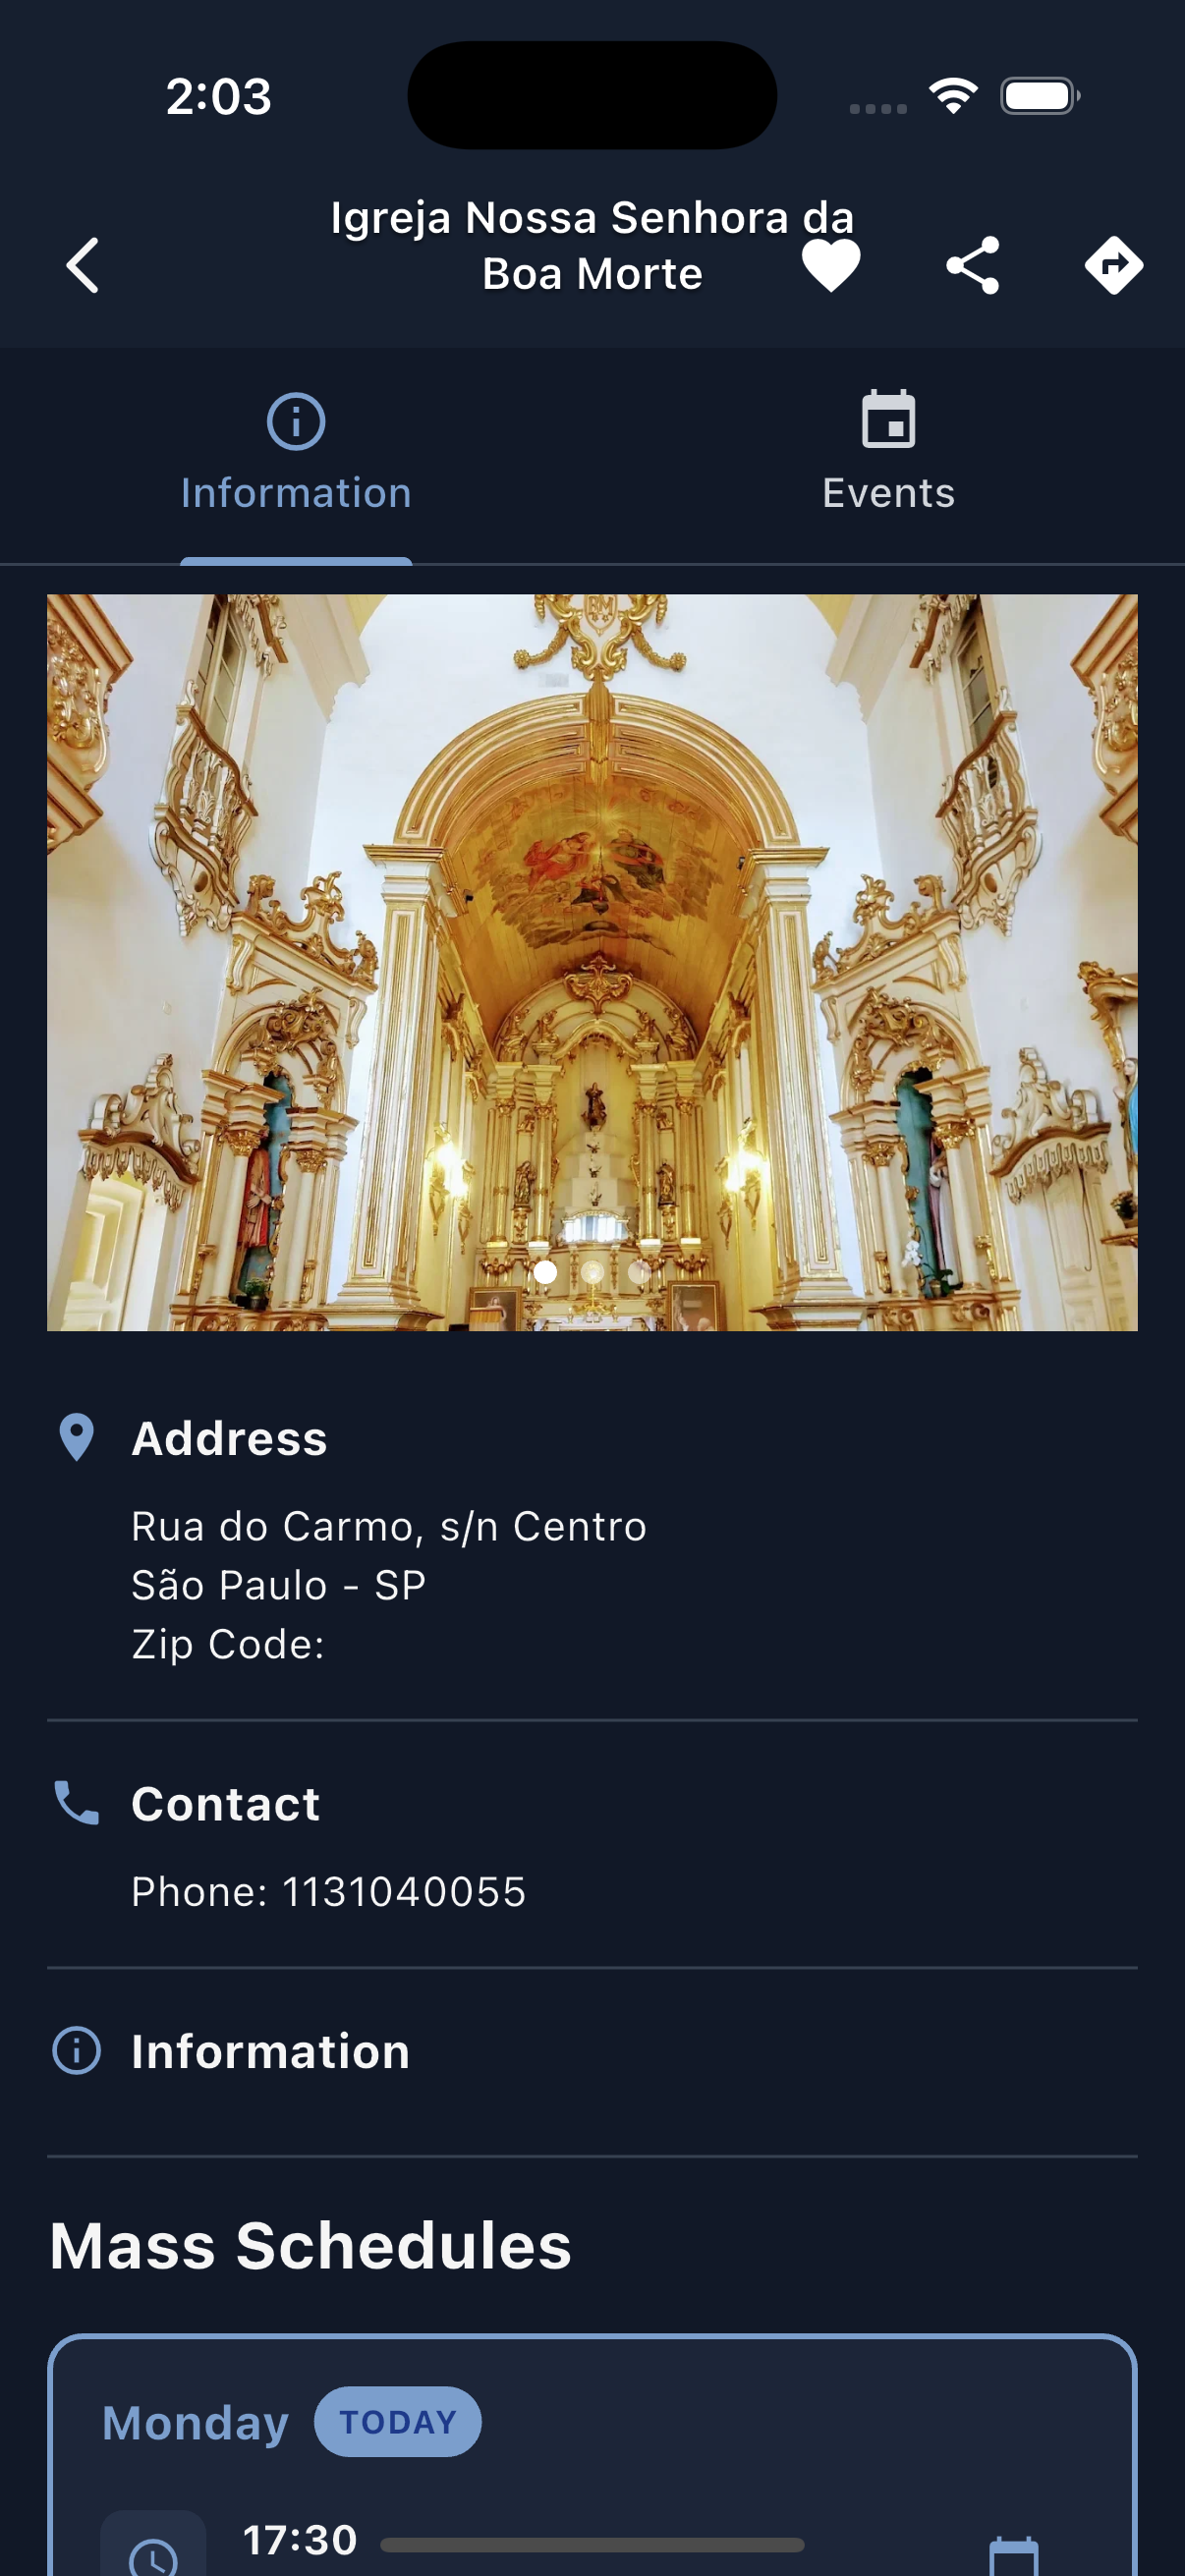
Parish Details

Events

Profile
Dark Mode
Admin Panel Preview
A powerful web-based dashboard for managing your parish community.
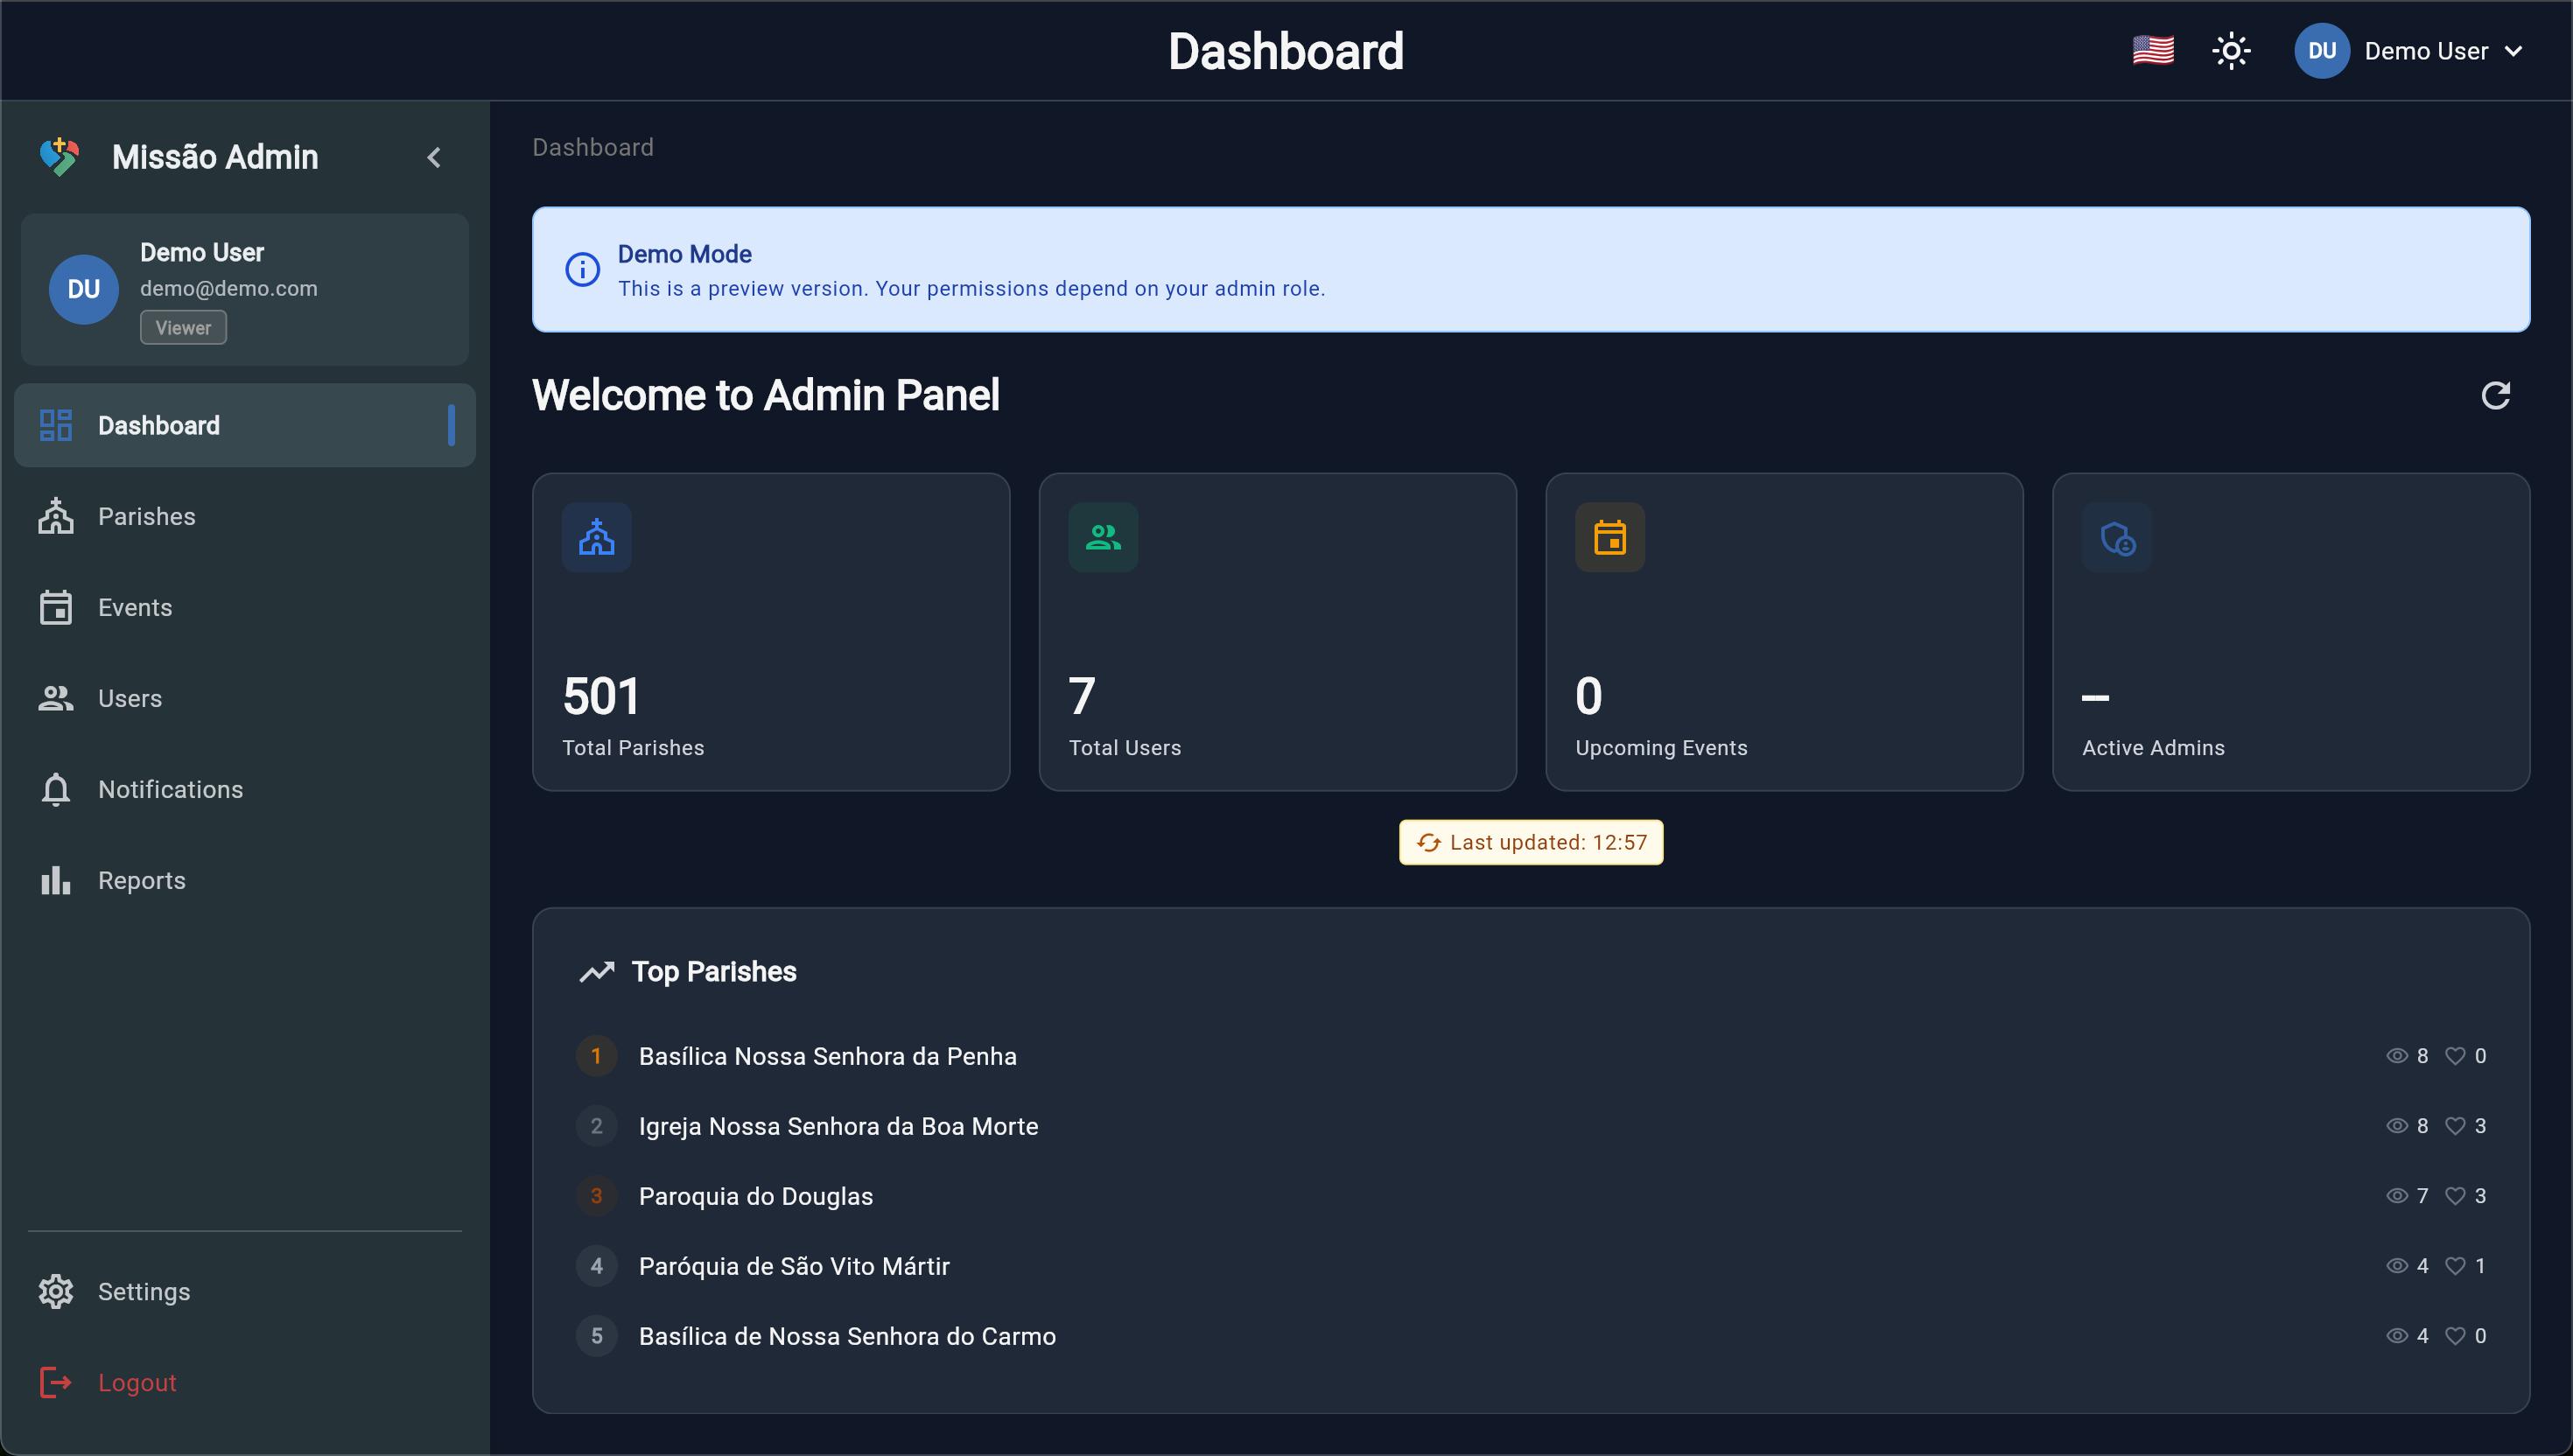
Dashboard with real-time metrics and charts
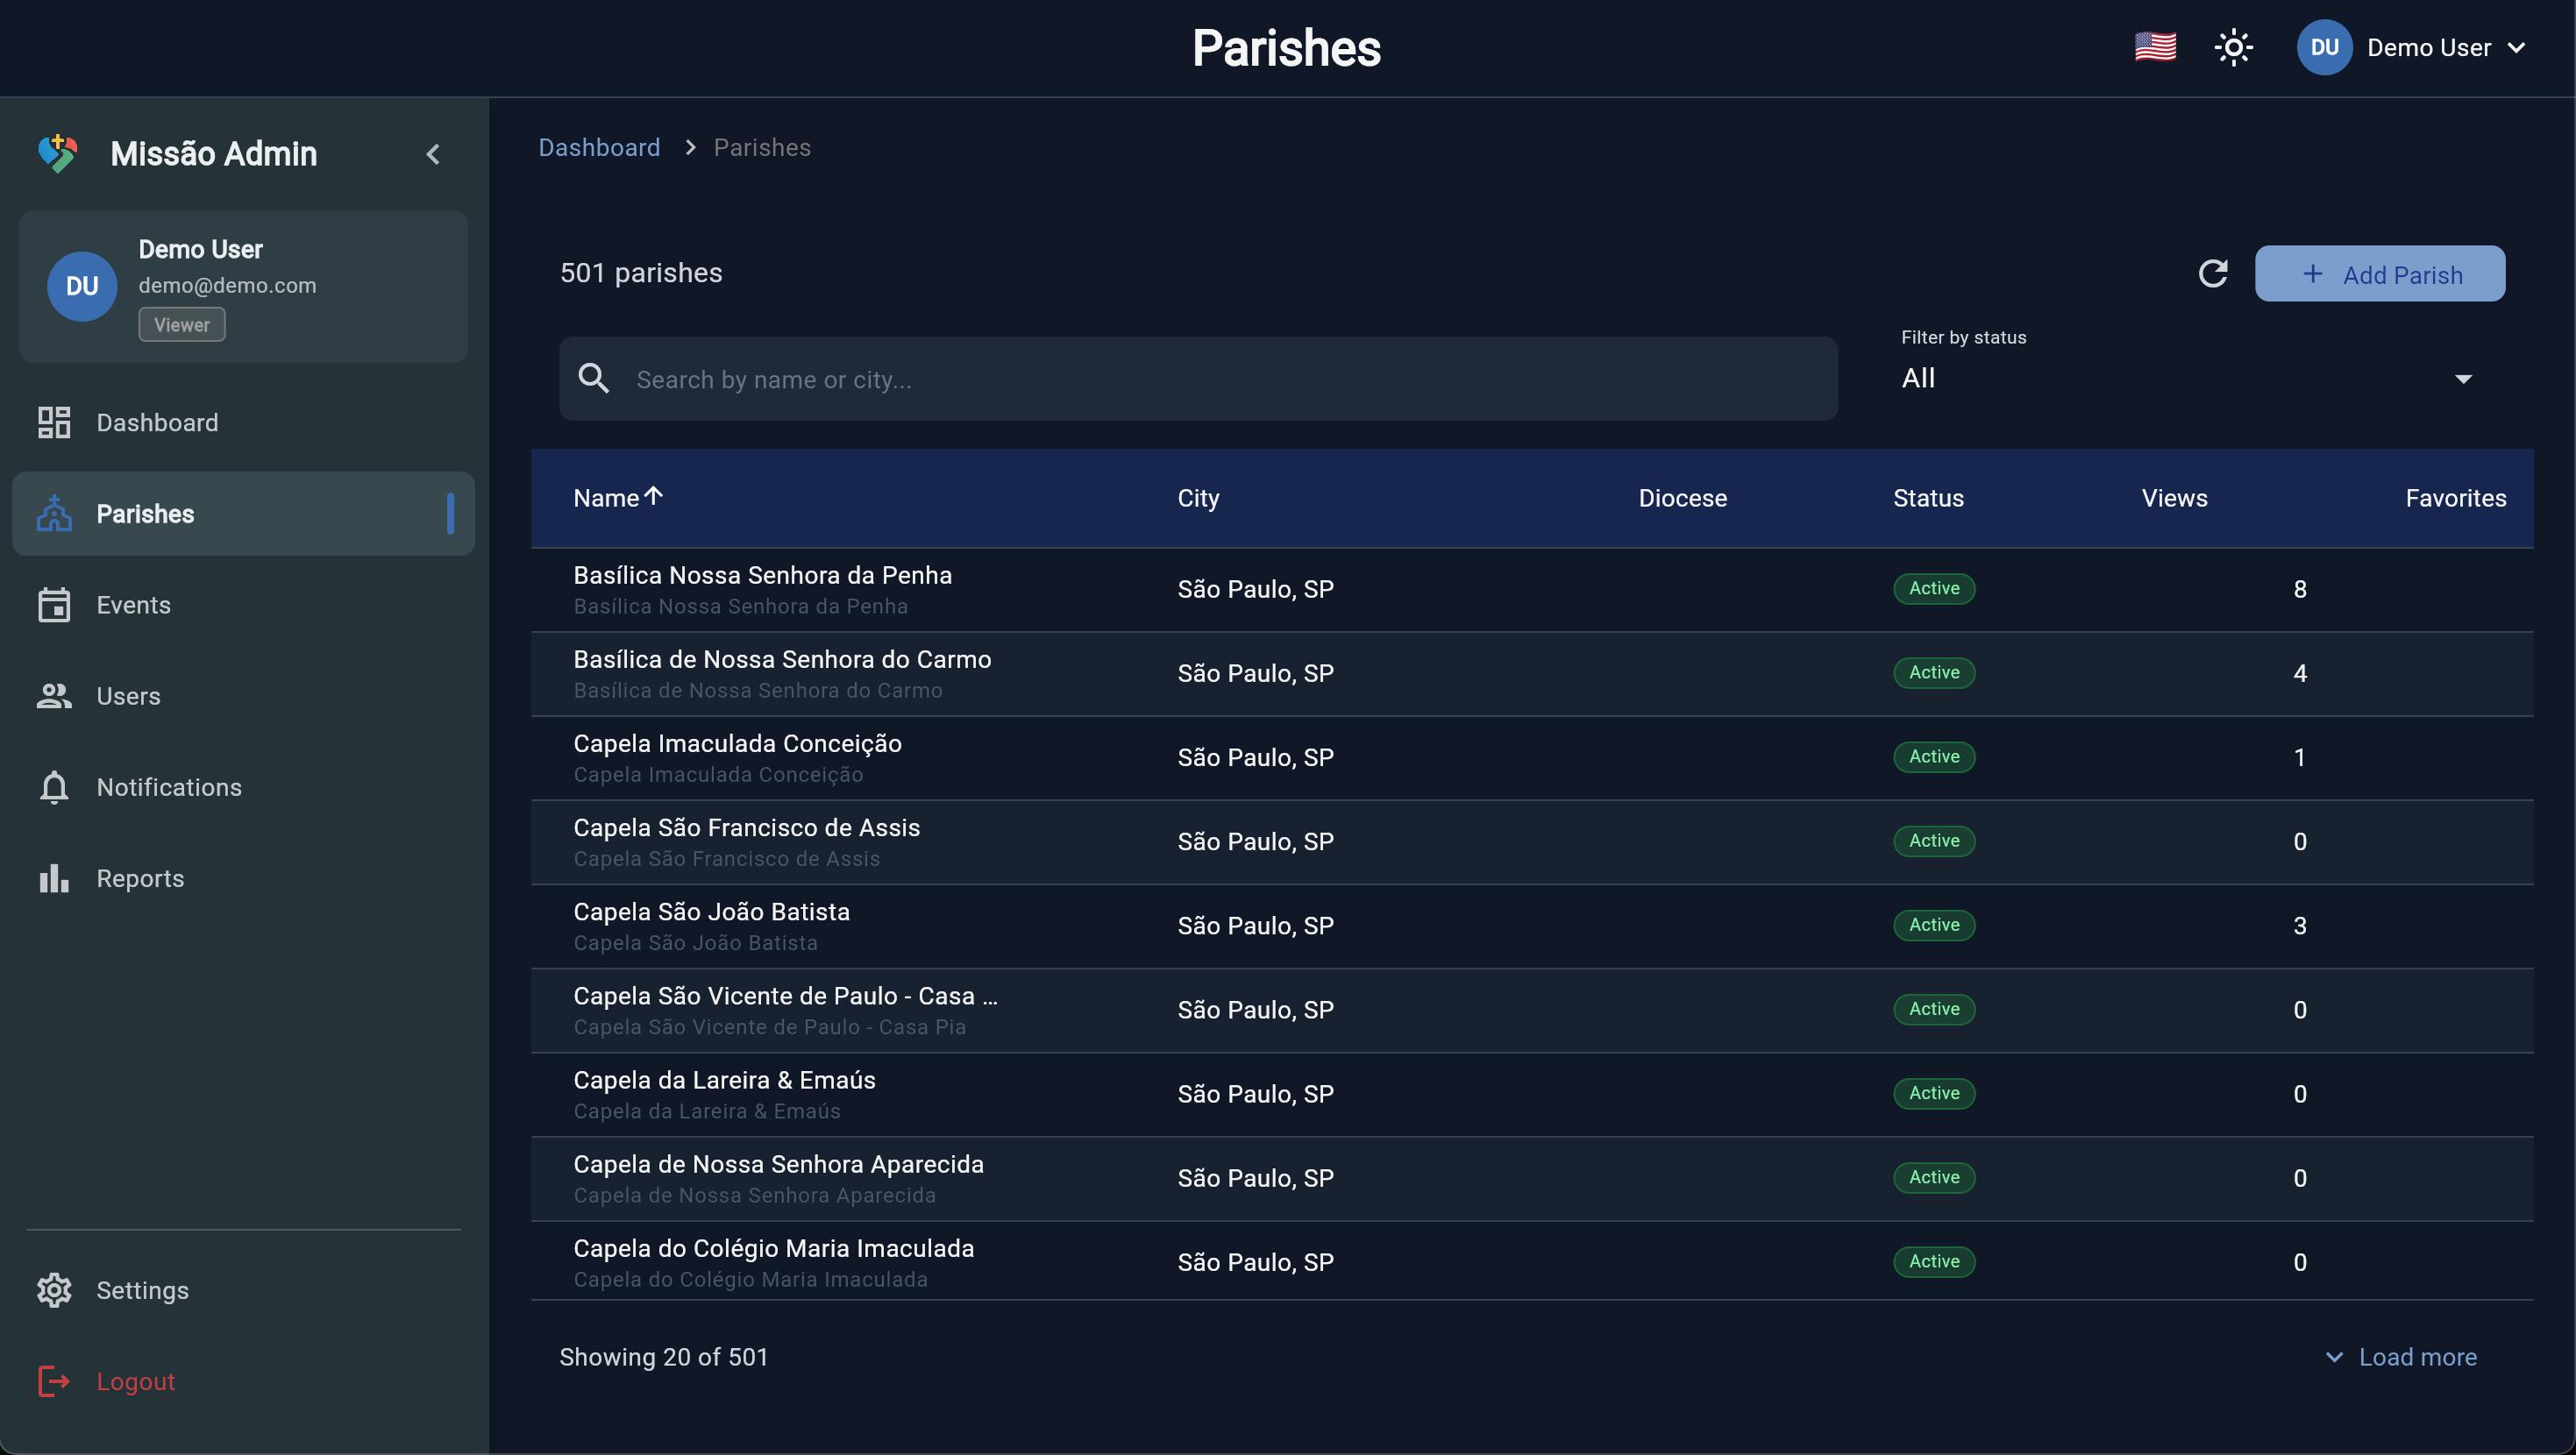
Parish management with search and filters

Event creation and scheduling
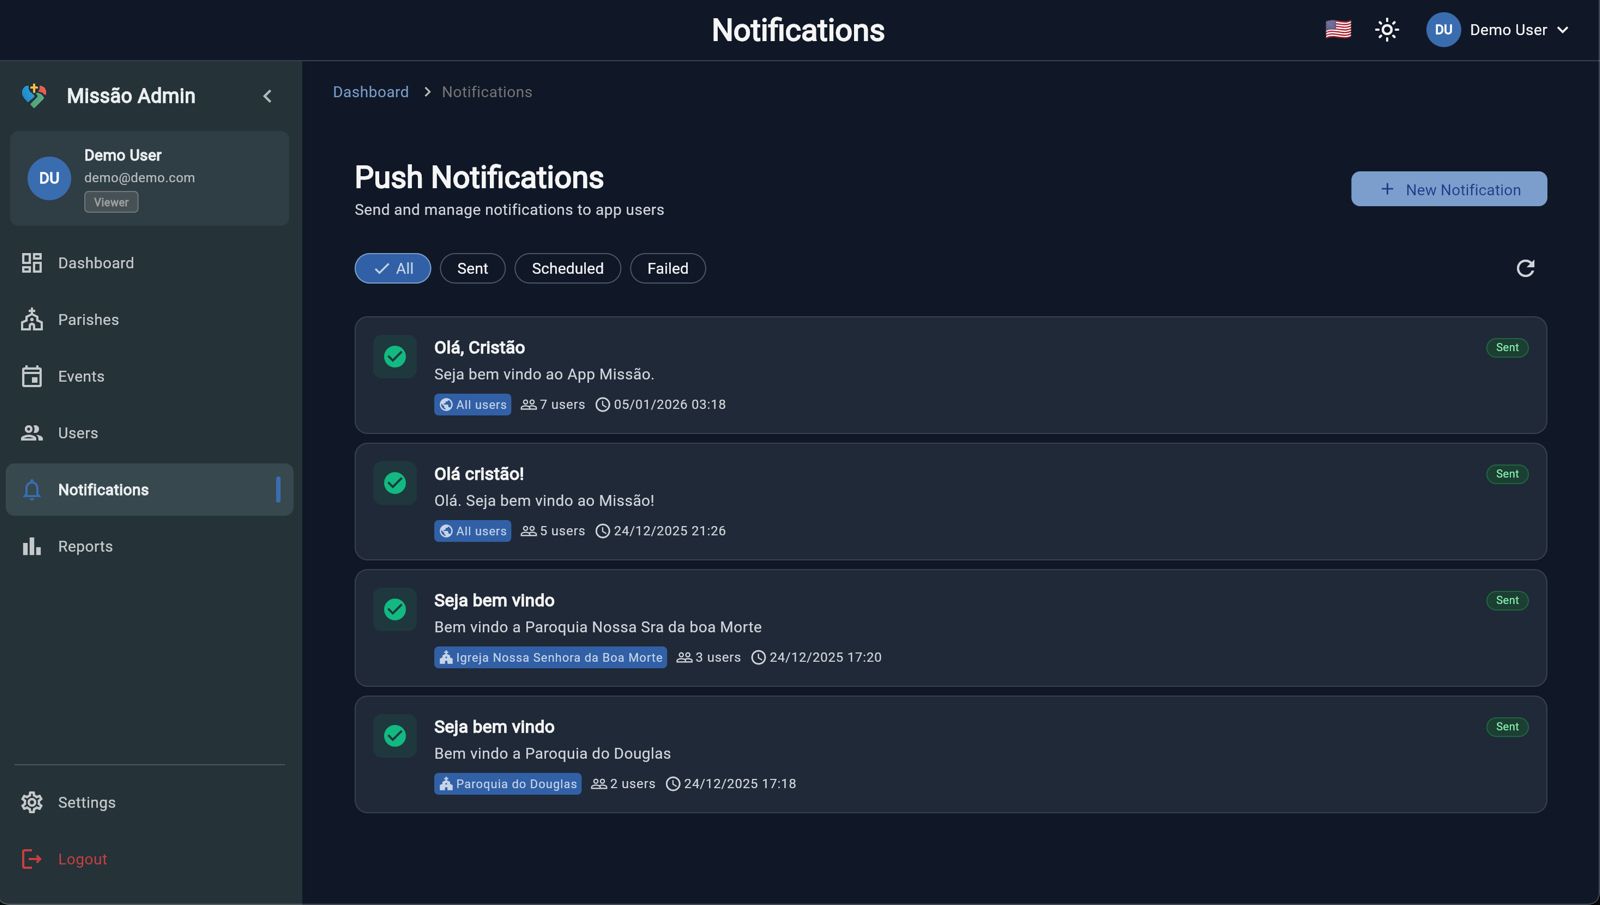
Push notification management

User management and analytics
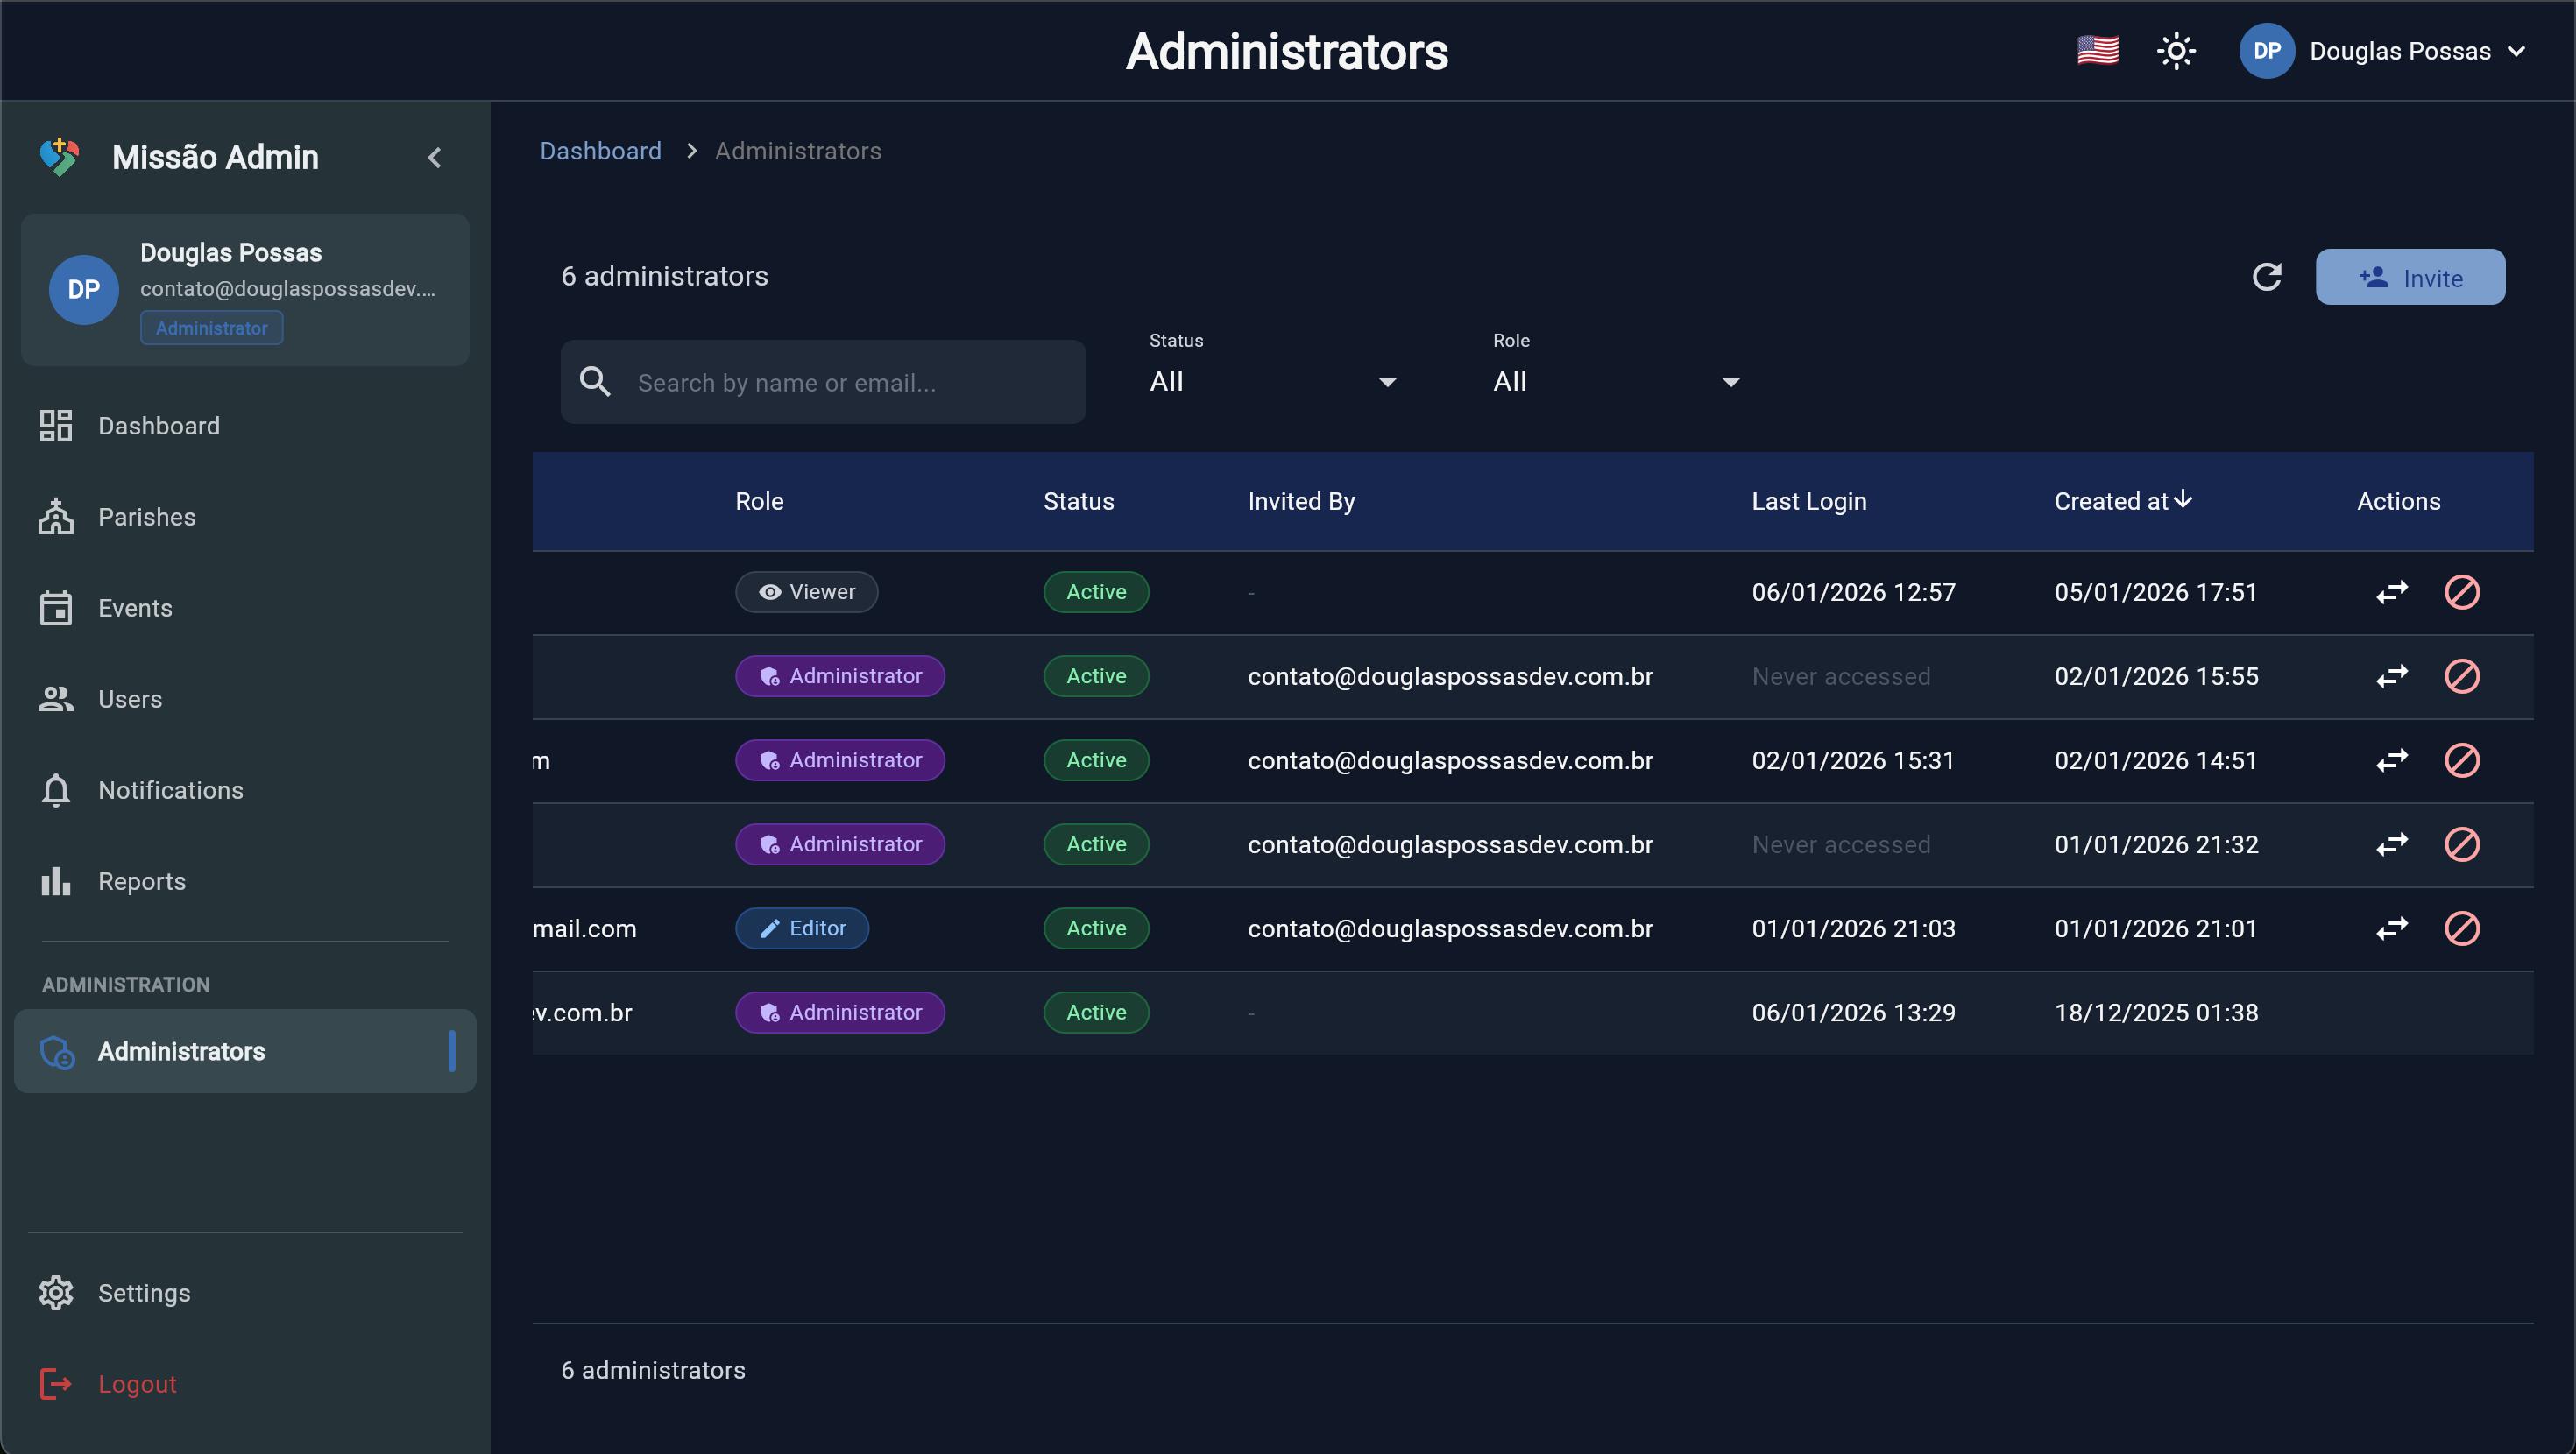
Admin roles and permissions
Demo Account: demo@missao.app / demo123
Getting Started
Thank you for purchasing Missão! This documentation will guide you through the installation, configuration, and deployment of your parish community application.
Package Contents
Mobile App
Cross-platform Flutter app for iOS and Android with parish search, maps, events, and user profiles.
Admin Panel
Web-based admin dashboard for managing parishes, events, users, and notifications.
Cloud Backend
Firebase Cloud Functions for secure server-side operations and data management.
Design System
Custom UI component library (Possas DS) with tokens, themes, and reusable widgets.
Key Features
Requirements
| Tool | Minimum Version | Recommended |
|---|---|---|
| Flutter SDK | 3.24.0 | 3.38.0+ |
| Dart SDK | 3.10.0 | Latest stable |
| Node.js | 18.x | 22.x |
| Firebase CLI | 13.0.0 | Latest |
| Xcode (iOS) | 14.0 | 15.0+ |
| Android Studio | Flamingo | Hedgehog+ |
Installation
Follow these steps to set up the project on your local machine.
Step 1: Extract the Package
Extract the downloaded ZIP file to your preferred location.
unzip missao-v1.0.0.zip -d ~/projects/
cd ~/projects/missao
Step 2: Install Flutter Dependencies
# Install main app dependencies
flutter pub get

# Install Design System package dependencies
cd packages/possas_ds
flutter pub get
cd ../..
Step 3: Install Cloud Functions Dependencies
cd functions
npm install
cd ..
Step 4: Configure Environment Files
Copy the example environment files and configure them with your credentials:
# Copy environment templates
cp .env.example .env.dev
cp .env.example .env.prod.env files with real credentials to version control.
Step 5: Run the App
# Run in development mode
flutter run --dart-define-from-file=.env.dev

# Run for web (Admin Panel)
flutter run -d chrome --dart-define-from-file=.env.dev
Continue to Firebase Setup to configure your backend.
Firebase Setup
Missão uses Firebase as its backend. Follow these steps to set up your Firebase project.
Step 1: Create a Firebase Project
- Go to Firebase Console
- Click "Add project"
- Enter your project name (e.g., "my-church-app")
- Enable Google Analytics (recommended)
- Click "Create project"
Step 2: Enable Firebase Services
Enable the following services in your Firebase Console:
| Service | Location | Configuration |
|---|---|---|
| Authentication | Build > Authentication | Enable Email/Password, Google, Apple |
| Firestore Database | Build > Firestore Database | Start in production mode, choose region |
| Cloud Storage | Build > Storage | Start in production mode |
| Cloud Functions | Build > Functions | Upgrade to Blaze plan required |
| Cloud Messaging | Engage > Messaging | Enabled by default |
southamerica-east1 (São Paulo).
Step 3: Configure FlutterFire
# Install FlutterFire CLI
dart pub global activate flutterfire_cli

# Configure Firebase for your project
flutterfire configure --project=YOUR_PROJECT_ID
This will generate lib/firebase_options.dart and platform-specific configuration files.
Step 4: Deploy Security Rules
# Deploy Firestore rules
firebase deploy --only firestore:rules

# Deploy Storage rules
firebase deploy --only storage
Step 5: Deploy Cloud Functions
# Deploy all functions
firebase deploy --only functions
See Configuration for detailed environment setup.
Configuration
Configure your application with the following environment variables and settings.
Environment Variables (.env)
# App Configuration
FLAVOR=dev                          # dev or prod
APP_NAME=My Church App              # Your app name

# Firebase Configuration
FIREBASE_API_KEY=your_api_key
FIREBASE_APP_ID=your_app_id
FIREBASE_PROJECT_ID=your_project_id

# Feature Flags
USE_FIREBASE_EMULATORS=false        # true for local development
ENABLE_ANALYTICS=true
ENABLE_CRASHLYTICS=true
ENABLE_DEBUG_LOGS=false

# Google Maps
GOOGLE_MAPS_API_KEY_ANDROID=your_android_key
GOOGLE_MAPS_API_KEY_IOS=your_ios_key
GEOCODING_API_KEY=your_geocoding_key
Google Maps API Setup
- Go to Google Cloud Console
- Enable Maps SDK for Android, Maps SDK for iOS, and Geocoding API
- Create API keys with appropriate restrictions
- Add keys to your environment files
SendGrid Email Setup (Optional)
For admin invitation emails, configure the Firebase Trigger Email extension:
# extensions/firestore-send-email.env
LOCATION=your-region
MAIL_COLLECTION=mail
DEFAULT_FROM=noreply@yourdomain.com
SMTP_CONNECTION_URI=smtps://apikey:YOUR_SENDGRID_API_KEY@smtp.sendgrid.net:465
iOS Configuration
Update ios/Runner/Info.plist with your app-specific information:
- Bundle Identifier
- Display Name
- Google Sign-In URL Scheme
Android Configuration
Update android/app/build.gradle.kts:
- Application ID (namespace)
- Version Code and Name
- Signing Configuration
Deployment
Deploy Admin Panel (Web)
# Build the admin panel
flutter build web --dart-define-from-file=.env.prod

# Deploy to Firebase Hosting
firebase deploy --only hosting:admin
Build Android APK
# Build release APK
flutter build apk --release --dart-define-from-file=.env.prod

# Build App Bundle (recommended for Play Store)
flutter build appbundle --dart-define-from-file=.env.prod
Build iOS App
# Build for iOS
flutter build ios --release --dart-define-from-file=.env.prod

# Open Xcode for archive and submission
open ios/Runner.xcworkspace
Deploy Cloud Functions
# Deploy all functions
firebase deploy --only functions

# Deploy specific function
firebase deploy --only functions:inviteAdminscripts/ folder for automated deployments.
Customization
Changing App Name & Branding
- Update
APP_NAMEin your.envfiles - Replace app icons in
android/app/src/main/res/andios/Runner/Assets.xcassets/ - Update splash screen in respective platform folders
Customizing Colors & Theme
Edit the Design System package tokens:
// packages/possas_ds/lib/src/tokens/colors.dart
class PDSColors {
  static const Color primary500 = Color(0xFF3498DB);  // Your primary color
  static const Color secondary500 = Color(0xFF2C3E50);
  // ... more colors
}
Adding New Languages
- Create new ARB file:
lib/l10n/app_XX.arb - Add translations following the existing format
- Run
flutter gen-l10n - Add locale to
supportedLocalesinmain.dart
Modifying Features
Each feature follows Clean Architecture:
lib/features/YOUR_FEATURE/
├── domain/           # Business logic
│   ├── entities/     # Data models
│   ├── repositories/ # Abstract interfaces
│   └── usecases/     # Use case implementations
├── data/             # Data layer
│   ├── datasources/  # API calls
│   ├── models/       # DTOs
│   └── repositories/ # Repository implementations
└── presentation/     # UI layer
    ├── viewmodels/   # State management
    ├── pages/        # Screens
    └── widgets/      # Components
FAQ & Troubleshooting
Common Issues
Firebase initialization failed
Solution: Ensure firebase_options.dart was generated correctly. Run flutterfire configure again.
Google Maps not showing
Solution: Verify your API keys are correct and the Maps SDK is enabled in Google Cloud Console.
Cloud Functions deploy fails
Solution: Ensure you're on the Firebase Blaze plan and Node.js 22 is installed.
iOS build fails with signing error
Solution: Configure your Apple Developer account in Xcode and select a valid team.
Admin panel shows blank page
Solution: Check browser console for errors. Ensure Firebase Hosting rewrites are configured correctly.
Getting Support
If you encounter issues not covered here:
- Check the comments section on CodeCanyon
- Email support at: contato@douglaspossasdev.com.br
- Response time: Within 24-48 hours (business days)